|
1.
THE FRONT SIDE OPERATION
OPERATION
1
The front
side of the torso is no big deal. A volume milling is followed by a surface
milling. All surfaces visible from the top are selected and machined.
| OPERATION
1 |
| Sequence
1 - Volume Milling - 10 mm end mill |
| |
Parameters:
Rough_stock_allow = 0.4
Rough_option = rough_&_clean_up |
| Sequence
2 - Surface Milling - 12 mm ball mill |
| |
Parameters:
Scallop_hght = 0.02
Lace_option = Line_connect
|
|

|
|
Note:
the surface milling sequence does not go deeper than the volume
milling sequence.
|
|
|
2.
CREATING SUPPORT PART
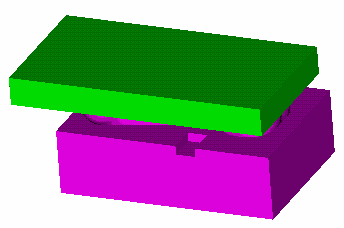
The front
side is now finish machined. We now need to glue the machined surfaces
down into a cavity,
with the exact same measures.
The amount
of glue to be used depends on the part. As little a possible, though the
part must be held firm in place. Before glueing, the support and torso
are waxed, so it is easier to take them apart after machining.
|
|

|
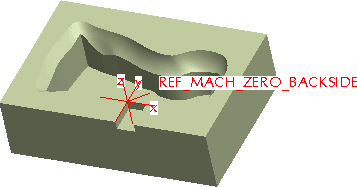
Notes:
This is what is required: a block with a cavity to fix the torso.
The exact size of this block is not critical, as long as you remember
to include a slot, which is the basis for the Reference Machine
Zero to be used for the back side operation.
Bottom
animation:
- Part
prior to torso 'trimming'
- After
torso 'trimming'
- To
limit the contact area between the two parts, another cut is
made. The glueing only has to be on the sides of the torso.
It also saves time, because the surface milling area is reduced.
- Slot
for easy Reference Machine Zeroing
How
to create the support part:
|
|
|
3.
MACHINING THE SUPPORT PART
OPERATION
2
Machining
the support is straightforward. The parameters can be the same as those
used for
the front side. The only difference is the Pro_stock_allowance, which
is slightly negative, to make room for the wax and glue. The mill digs
deeper than it really should.
| OPERATION
2 |
| Sequence
1 - Volume Milling - 10 mm end mill |
| |
Parameters:
Rough_stock_allow = 0.4
Rough_option = rough_&_clean_up |
| Sequence
2 - Surface Milling - 12 mm ball mill |
| |
Parameters:
Prof_stock_allow = -0.05/-0.1
Scallop_hght = 0.02
Lace_option = Line_connect
|
|
|
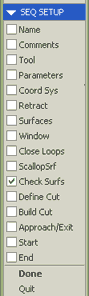
Select
'Check Surfs' to control which surfaces are used in gouge checking
|
Notes:
In
this example - in seq. 2 - I had to remove all the default 'check
surfaces' Pro/E uses, to avoid unintended cutting of anything
else but the surfaces selected for milling.
The
cavity of a support part will always be something like in this
example, so it is perfectly safe to accept all 'check surfaces'
removed.
|
|
|
4. THE
BACK SIDE OPERATION
OPERATION
3
With the
torso glued into the cavity support, and the Reference Machine Zero according
to the slot, the back side operation is quite simple.
Sometimes
it is a good idea to go a little slower on the part , when it is glued,
so it won't break loose before the milling is over.
| OPERATION
3 |
| Sequence
1 - Volume Milling - 10 mm end mill |
| |
Parameters:
Rough_stock_allow = 0.4
Rough_option = rough_&_clean_up |
| Sequence
2 - Surface Milling - 12 mm ball mill |
| |
Parameters:
Scallop_hght = 0.02
Lace_option = Line_connect
|
|
End
of case study
|
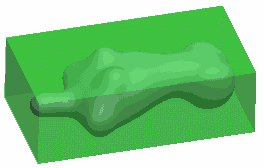
 This case study will help you when you do your final assignment in CAM.
This study is focused on the technique to use, when a part is problematic
to clamp, like the torso in the picture to the right. Spend about 10
minutes to read this study.
This case study will help you when you do your final assignment in CAM.
This study is focused on the technique to use, when a part is problematic
to clamp, like the torso in the picture to the right. Spend about 10
minutes to read this study.