![]()
EMPIRICAL CALCULATION OF THE SURFACE AREA OF AN OBJECT
Andrea Mazzilli, Manuf. Eng. & Torben Lenau Ass. Prof. Ph.D.
Department of Manufacturing Engineering
DTU, Building 425
DK-2800 Lyngby
Tel. ++45 45254811
Fax ++45 45254803
E-mail: <tl@ipt.dtu.dk>
ABSTRACT
The calculation of the surface area of an object is not always an easy task. In fact, sometimes, the surface area of objects with very complicated or elaborated
shapes (e.g. with hollow parts or holes) cannot be directly and precisely calculated. Therefore, in order to have a quick measure of it, an empirical method, which
approximate the real value of the area, is necessary.
The natural question which emerges is:
"what is the best method to estimate the surface area of an object?"
Naturally the answer is not unique and absolute. In fact, it depends on what this measure is used for, and therefore the consequences of a possible error.
In order to find out what kind of methods can be used, and how good is the value of the area they supply, a series of examples is considered.
For each of these cases, a likely real value of the area is calculated, either mathematically (simple cases) or with the aid of the AUTOCAD system. By drawing the
components on 3D, the AUTOCAD is able to calculate their surface area using the function "solarea".
Basically one can group all the shapes of possible objects in three different categories: 1. Simple shapes; 2. Complex shapes; 3. Composed shapes.
The principle of the method is to try to find common shapes which can circumscribe in some ways the real shapes and give a good approximation of the measure of
their surface area.
EXAMPLES
1. Simple shapes (simple candlestick)
Simple shapes are those which have smooth surfaces without any decoration and none or very few particulars. This property allows them to be easily circumscribed
with a common geometry. Furthermore the lack of decoration and particulars enables to get good approximations, because the suitable selected geometry is very
close to the real shape.
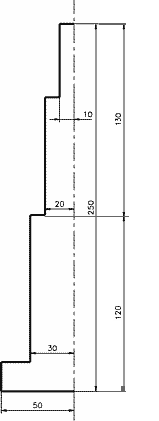
The case of the simple candlestick, which is going to be shown can be classified under this category.
This candlestick is composed of four cylinders and therefore not very complicated.
The value of its surface area can be mathematically calculated :
S = 5,4 dm2
In order to have a quick value though, which can be found out empirically without need for to many calculations, one can try to approximate the object with more
simple geometrical shapes. By this way an easier calculation of the value is paid with an error on it, which, if not so serious, is acceptable because it wouldn’t
compromise following considerations.
It is not so difficult to find the most suitable common geometry for the approximation.
The closest to the real shape looks to be a cut circumscribed cone or a cylinder with an average base radius.
In this case, since the surface has no decorations or particulars not considered by the approximation, a cut circumscribed pyramid would give a too high value
because the parts the pyramid adds are not compensated by a lack of other particulars.
- Approximations
1. Cylinder (h = 250 mm)
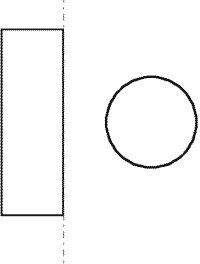
a. R (base radius) = 50 mm; S = 9,4 dm2, (174 % of the real value).
b. R = 30 mm; S = 5,3 dm2, (98 %).
c. R = 20 mm; S = 3,4 dm2, (63 %).
2. Cut cone
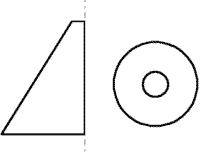
Rinf = 50 mm; Rsup = 10 mm ; h = 250 mm;
S = (Rinf + Rsup)·pi·[ h² + (Rinf - Rsup)²]1/2 = 5,6 dm2, (104 %).
3. Cut pyramid (squared base)
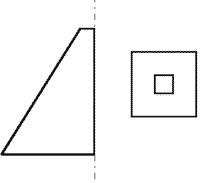
Winf = 100 mm; Wsup = 20 mm; h = 250 mm;
S = 7,1 dm2, (130 %).
From the analysis of the dates all the hypotheses set are confirmed. The cone and the average base radius cylinder give the best approximations, with a minimum
relative error. According to the expectations the cut circumscribed pyramid gives a too high value, even if the error is not enormous.
The two extreme examples are considered in order to show how big can be the error, when unthinkable approximations (therefore clearly wrong) are taken into
consideration. As one can see the relative error is not even 100 %.
This is very important to set an upper value to the possible errors one can make.
2. Complex shapes (complex candlestick)
Complex shapes are those which have a lot of particulars or decorations. For these shapes it is not so difficult to find an approximation for the global geometry.
Therefore, disregarding all the particulars, the shape can be considered as a simple shape, an then, all the considerations stated for the previous case are valid.
Starting from this statement, a suitable shape for the approximation should be the one which allows the approximation of the basic shape of the object, as well as a
compensation of the parts disregarded.
The case of this complex candlestick can be a good example of this category of shapes.
In this case it is unthinkable to try to calculate precisely and mathematically the value of the surface area of the object. The decoration it is provided with increases
very mach the complexity of the part.
It is though very easy to draw its profile with the AUTOCAD system and then create the 3D object by rotation. It is then possible, using the AUTOCAD function
"solarea" , to find a precise value of the surface area required.
In this case AUTOCAD gives: S = 7,9 dm2.
This value allows a comparison with the ones which will be calculated by approximated methods, in order to find how reliable are, and therefore how "good" is the
method.
In this case neither is difficult to find reasonable approximations, even if the task becomes complicated because of the difficulty of considering a right compensation.
Following the criterion set, likely right approximations for the basic shape are an average base radius cylinder or cut circumscribed cone.
But the compensation, needed for all the particular disregarded, makes necessary to considerate wider approximations, which can reasonably be either a
circumscribed cylinder or a cut circumscribed pyramid. With a reasonable observation one could furthermore say that, likely, the cylinder will give a higher error,
compared to the one of the pyramid, because the shape of the latter follows in a better way the profile of the object.
- Approximations
1. Cylinder

R (radius base) = 50 mm; h = 250 mm;
S = 9,4 dm2, (119 %)
2. Cut cone

Rinf = 50 mm; Rsup = 20 mm ; h = 250 mm;
S = (Rinf + Rsup)·pi·[ h² + (Rinf - Rsup)²]1/2 = 6,4 dm2, (81 %).
3. Parallelepiped (squared base)
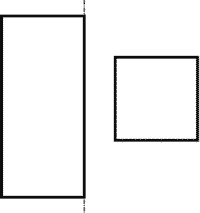
W = 100 mm ; h= 250 mm;
S = 12 dm2, (152 %).
4. Cut pyramid (squared base)

Winf = 100 mm; Wsup = 40 mm; h = 250 mm;
S = 8,2 dm2, (104 %).
From the analysis of the dates in this case as well all the hypotheses are confirmed. The cylinder and the pyramid give the closest approximations, and the pyramid a
lower relative error.
The cone give a too low value because it isn’t able to compensate the disregarded particulars.
The last example, as in the previous case, is set just to show how bad can be the approximation, when clearly not suitable shape are considered, and therefore give
an idea of possible upper values for the relative error.
3. Composed shapes (water tap)
Composed shapes are those which cannot be immediately identified with a common geometry, but which need to be decomposed in more sub-parts, which can be
considered as simple or complex shapes.
The case of this water tap is a simple example of this category of objects.
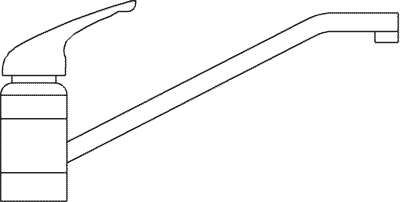
In this case the part is complicated because cannot be directly associate to any regular geometry, but can be seen as composed of some "sub-components".
It is therefore necessary to consider the object as divided in three different sub-parts:1. the water tap body; 2. the outlet pipe; 3. the on/off handle. Each of these
ones can be more easily associated to a common geometry.
Also AUTOCAD drawing is more complicated, and has to be made dividing as described the component, even if it is anyway very difficult to get a very precise
quick drawing. The value of the area found in this way is very close to the real one, but not the real one itself. The error though is insignificant.
The value that AUTOCAD gives is: S = 5,9 dm2.
- Approximations
1. WATER TAP BODY

This part can be considered as a simple part. It is very similar to a cylinder, therefore is not so complicated to approximate it.
Using a cylinder with: R (base radius) = 27 mm; h = 116 mm; and considering only its lateral surface, the value of S1 is:
S1 = 1,9 dm2.
2. OUTLET PIPE
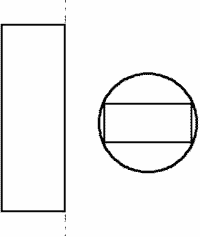
This part can be also considered as a simple part, but more approximating solutions can be found. In fact both, a circumscribed cylinder and parallelepiped can be
effective approximations.
a. Cylinder
R = 14 mm; h = (165 + 64) = 259 mm; considering only one base;
S2 = 2,34 dm2.
b. Parallelepiped (rectangular base)
a = 15 mm; b = 28 mm; h = (165 + 64) = 259 mm; considering only one base;
S2 = 2,27 dm2.
3. ON/OFF HANDLE
This is definitely the most difficult part to deal with. Even if it can be considered as a simple part, its shape is so particular that it is anyway very difficult to find an
appropriate geometry for is approximation.
Therefore, in these cases, the most similar common shape is considered and, according to its deviations by comparison with the real shape, a compensation is
performed by setting the variables a little over or under the average values of the component.
In this case a cut pyramid and a parallelepiped, which almost circumscribe the parts, are considered. The parameters are set a little over the average values because
these shapes (particularly the pyramid) disregard some particular of the object.
a. Cut pyramid (rectangular base)
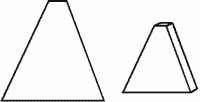
a1 = 50 mm; b1 = 10 mm; a2 = 25 mm; b2 = 10 mm; h = 115 mm.
S2 = 1,05 dm2.
b. Parallelepiped (rectangular base)
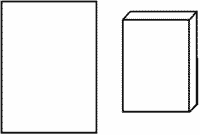
a = 50 mm; b = 10 mm;
S3 = 1,48 dm2.
Therefore one has different possibilities for estimating the global surface area of this water tap. Combining the different possibilities one gets:
A. 1/2a/3a: SA = 5,3 dm2, (90 %).
B. 1/2b/3a: SB = 5,2 dm2, (88 %).
C. 1/2a/3b: SC = 5,7 dm2, (97 %).
D. 1/2b/3b: SD = 5,65 dm2, (96 %)
In this case it is difficult to evaluate the precision of the solutions considered for each component. Therefore a global evaluation seems to be the best criterion for
comparing them with the real value, even if, in this way one loose the control on the origin of possible deviations.
From the analysis of the date, all the solutions are reasonably close to the real value, mostly if one considers the complexity of the part.
All these examples and the results obtained show that the methodology exposed for the empirical calculation of the surface area of an object is quite reliable.
- OBJECTIVE
It is very difficult though to evaluate how "good" is a method without having a criterion to base this evaluation. For example, a 10 % error is acceptable or not?
The answer is clearly: "it depends on what the measure affected by the error is used for!"
Therefore, it is very important to set an objective which can help to decide when the error is not acceptable. Hence it is not the precision of the method itself which
is important, but its precision with respect to the objective set.
Furthermore, the commodity of the method, that is "how easy is the calculation", is another not less important factor to be considered.
Most of the time there is a trade-off between these two variables, therefore, the more precise is the method, the more complicated.
But, how precise should be the method?
In order to answer this question it is basic to know what the values obtained are used for.
- Electroplating costs calculation
The measure of the surface area of an object is necessary for many purposes.
One of them is the calculation of costs for electroplating processes. From now on a direct reference to the article "Electroplating Costs Calculation , Andrea
Mazzilli & Torben Lenau (1996)" is made.
From that paper one can notice that the surface area has a direct effect on two variables.
1. The material cost.
2. The electroplating time.
1. Material cost
Material cost depends on two different variables, the material’s price and the amount of material to be deposited. The latter depends on the material’s density, the
coating thickness and the surface area of the object to be coated.
Therefore theoretically, for electroplating processes which involve materials with high price, high density or which require high coating thickness, an error on the
estimate of the surface area of the part to be coated can cause quite important errors on the material’s cost estimate, and consequently on the global cost estimate
for the process.
Practically, the only influent variable is the material’s price. In fact, an error on the surface area estimate when the material is very costly (e.g. gold, platinum, silver),
has quite important consequences on the material’s cost estimate and therefore on its reliability.
2. Electroplating time
Electroplating time is also influenced by the surface area of the part to be coated.
Even if the bath’s time doesn’t change when S varies, plating time of a single part does change. In fact, the bath is always filled at the top of its capacity, and bath’s
time is used to coat all the parts contained in it. The plating time of a component is only a part (proportional to its surface) of the bath’s time.
Therefore when the process is long-time requiring (e.g. hard-chromium), an error on the surface area estimate of a part has a large influence on its plating time, and
consequently on the labor and equipment costs.
A third variable, which might be only indirectly affected by an error on the value of the surface area, is the labor time. In fact the larger is the piece the more difficult
can be its handling and therefore the labor time related.
But only very big errors can cause a deviation of this value, because labor times are constant within a very wide range for the part’s size. Therefore labor time can
be considered constant, since the errors dealt with aren’t so important.
EXAMPLES
In order to practically evaluate the influence on the global cost estimate of an error on the surface area value, some examples are here exposed.
The same object (the complex candlestick previously described) is considered, and different processes are taken into consideration with the different values for the
surface area S previously calculated by different approximating methods.
The cost is calculated following a method which considers average values of average industrial productions (medium production volume), for setting the parameters
of the processes dealt with. Therefore the values found are just an indicative reference.
The processes considered are accurately selected in order to allow interesting considerations.
a. Silver plating (13µm)
0) Real: S = 7,9 dm2;
Cm = 15,1 DKK/part (27 % of the total cost)
Cl + Ce = 40,3 DKK/part (73 %)
Ctot = 55,4 DKK/part
1) Cylinder: S = 9,4 dm2, 119 % (of the real value);
Cm = 18,0 DKK/part, 119 %
Cl + Ce = 44,8 DKK/part, 111 %
Ctot = 62,7 DKK/part, 113 %
2) Cone: S = 6,4 dm2, 81 %
Cm = 12,2 DKK/part, 81 %
Cl + Ce = 35,8 DKK/part, 89 %
Ctot = 48,1 DKK/part, 87 %
3) Parallelepiped: S = 12 dm2, 152 %
Cm = 22,9 DKK/part, 152 %
Cl + Ce = 52,6 DKK/part, 130 %
Ctot = 75,5 DKK/part, 136 %
4) Cut pyramid (squared base): S = 8,2 dm2, 104 %
Cm = 15,7 DKK/part, 104 %
Cl + Ce = 41,2 DKK/part, 102 %
Ctot = 56,9 DKK/part, 102,5 %
Silver plating is a precious-metal plating process.
From the analysis of the dates one can notice:
1. Silver is quite expensive and therefore material’s cost constitutes almost 30 % of the total cost, while the rest of it is related to the time employed.
2. The variation (%) of the material cost (Em%) is same as the variation (%) of the surface area of the object to be coated (Es%).
3. The variation (%) of the cost related to the time factor (Et%) is linearly proportional to Es%, but is always lower.
The three previous considerations allow to say that the error (%) made on the total cost calculation (Ec%), due to an approximation of the surface area S, is always
lower then Es%.
b. Gold plating (1,5µm)
0) Real: S = 7,9 dm2;
Cm = 228,7 DKK/part (88 % of the total cost)
Cl + Ce = 30,3 DKK/part (12 %)
Ctot = 259 DKK/part
1) Cylinder: S = 9,4 dm2, 119 % (of the real value)
Cm = 272,1 DKK/part, 119 %
Cl + Ce = 32,8 DKK/part, 108 %
Ctot = 304,9 DKK/part, 117 %
2) Cone: S = 6,4 dm2, 81 %
Cm = 185,3 DKK/part, 81 %
Cl + Ce = 27,7 DKK/part, 91 %
Ctot = 213 DKK/part, 82 %
3) Parallelepiped: S = 12 dm2, 152 %
Cm = 347,4 DKK/part, 152 %
Cl + Ce = 37,3 DKK/part, 123 %
Ctot = 384,7 DKK/part, 148,5 %
4) Cut pyramid (squared base): S = 8,2 dm2, 104 %
Cm = 237,4 DKK/part, 104 %
Cl + Ce = 30,8 DKK/part, 101,5 %
Ctot = 268,2 DKK/part, 103,5 %
Gold plating is another precious-metal plating process.
From the analysis of the dates:
1. Almost 90 % of the total cost is due to the material.
2. & 3. Same consideration as for silver plating.
Ec% is almost the same as Es%.
c. Hard-chromium
0) Real: S = 7,9 dm2;
Cm = 0,5 DKK/part (0,1 % of the total cost)
Cl + Ce = 440,8 DKK/part (99,9 %)
Ctot = 441,3 DKK/part
1) Cylinder: S = 9,4 dm2, 119 % (of the real value)
Cm = 0,5 DKK/part
Cl + Ce = 522,7 DKK/part
Ctot = 523,3 DKK/part, 118,5 %
2) Cone: S = 6,4 dm2, 81 %
Cm = 0,4 DKK/part
Cl + Ce = 358,9 DKK/part
Ctot = 359,3 DKK/part, 81,5 %
3) Parallelepiped: S = 12 dm2, 152 %
Cm = 0,7 DKK/part
Cl + Ce = 664,8 DKK/part
Ctot = 665,5 DKK/part, 151 %
4) Cut pyramid (squared base): S = 8,2 dm2, 104 %
Cm = 0,5 DKK/part
Cl + Ce = 457,2 DKK/part
Ctot = 457,7 DKK/part, 103,5 %
Hard-chromium plating is a long-time requiring process.
From the analysis of the dates:
1. Almost 100 % of the cost is due to a time-factor.
2. The variation of the material’s cost is insignificant for the total cost estimate.
3. Et% is linearly proportional to Es% and is almost the same as it.
Ec% due to Es% is almost the same as Es%.
d. Copper plating
0) Real: S = 7,9 dm2;
Cm = 0,4 DKK/part (0,5 % of the total cost)
Cl + Ce = 60,2 DKK/part (99,5 %)
Ctot = 60,6 DKK/part
1) Cylinder: S = 9,4 dm2, 119 % (of the real value)
Cm = 0,5 DKK/part
Cl + Ce = 68,4 DKK/part
Ctot = 68,9 DKK/part, 113,5 %
2) Cone: S = 6,4 dm2, 81 %
Cm = 0,36 DKK/part
Cl + Ce = 52,0 DKK/part
Ctot = 52,36 DKK/part, 86,5 %
3) Parallelepiped: S = 12 dm2, 152 %
Cm = 0,7 DKK/part
Cl + Ce = 82,7 DKK/part
Ctot = 83,4 DKK/part, 137,5 %
4) Cut pyramid (squared base): S = 8,2 dm2, 104 %
Cm = 0,4 DKK/part
Cl + Ce = 61,9 DKK/part
Ctot = 62,3 DKK/part, 103 %
Copper plating is a common electroplating process.
From the analysis of the dates:
1. 99,5 % of the total cost is due to the time-factor; the material is therefore insignificant.
2. Et% is linearly proportional to Es%, and, since the process isn’t long-time requiring, always lower then it.
The two previous considerations allow to say that Ec%, due to an approximation of the surface area S, is always lower then Es%.
These four examples aimed to show how an error on S’s estimate can affect cost calculation of 4 different kind of processes: costly material processes; high-costly
material processes; long-time requiring processes; and common processes.
The general consideration that is useful to make is that, no matter which category of processes is considered, Es% is an upper value for the consequent error (%) on
the total cost (Ec%).
For high-costly material and long-time requiring processes the two errors are about the same. For all the other processes the cheaper the material used and the
shorter the time required, the lower is Ec%.
- CONCLUSION
From all the topic previously analyzed, it can be stated that, the method exposed to empirically calculate the surface area of an object, for the following estimate of
electroplating cost of it, is quite reliable.
In fact, beside the facts that the relative error for the estimate of the total cost of the process is limited by the error committed on the calculation of the surface area,
and this calculation gives values reasonably close to the real ones, it has to be considered that the method used for electroplating costs estimate is also an empirical
method and therefore full of approximations. Hence, if one considers all the simplifications and approximations used in the cost-estimate, having a value for S very
close to the real one looses ever more importance.
The conclusion is that the errors made for calculating the surface area of a part with the method exposed are acceptable.
Particular attention has to be paid when considering large parts. In fact, in those cases, a little relative error can be a very big absolute error.